Git Learning Trail
This learning trail is for those who are new to Git and would like to learn it in advance to prepare for the course.
These topics are covered during the regular course schedule and in the course textbook as well. So, doing this in advance is optional, but doing so can reduce your workload during the regular semester.
Note before you start:
- Watching the given videos is optional but recommended. They cover almost the same ground as the text content, but provide a more visual view of the explanations. Watch if you can spare the time.
- Doing the given activities is strongly recommended. It is not enough to just go through the content -- you need to get some hands-on practice.
- If you encounter any problems while following this learning trial, you can post in the course forum (requires a Github account).
Intro to RCS
Git is a tool used for revision control. So, let's start by learning some basic revision control concepts.
Phase 1: Recording Revision History
In this phase, you'll start using Git to practice recording revision histories in your own computer.
[Textbook location: Tools → Git and GitHub → init: Getting started]
Can create a local Git repo
Let's take your first few steps in your Git journey.
0. Take a peek at the full picture(?). Optionally, if you are the sort who prefers to have some sense of the full picture before you get into the nitty-gritty details, watch the video in the panel below:
1. First, install Sourcetree (installation instructions), which is Git + a GUI for Git. If you prefer to use Git via the command line (i.e., without a GUI), you can install Git instead.
2. Next, create a directory for the repo (e.g., a directory named things).
3. Then, initialize a repository in that directory.
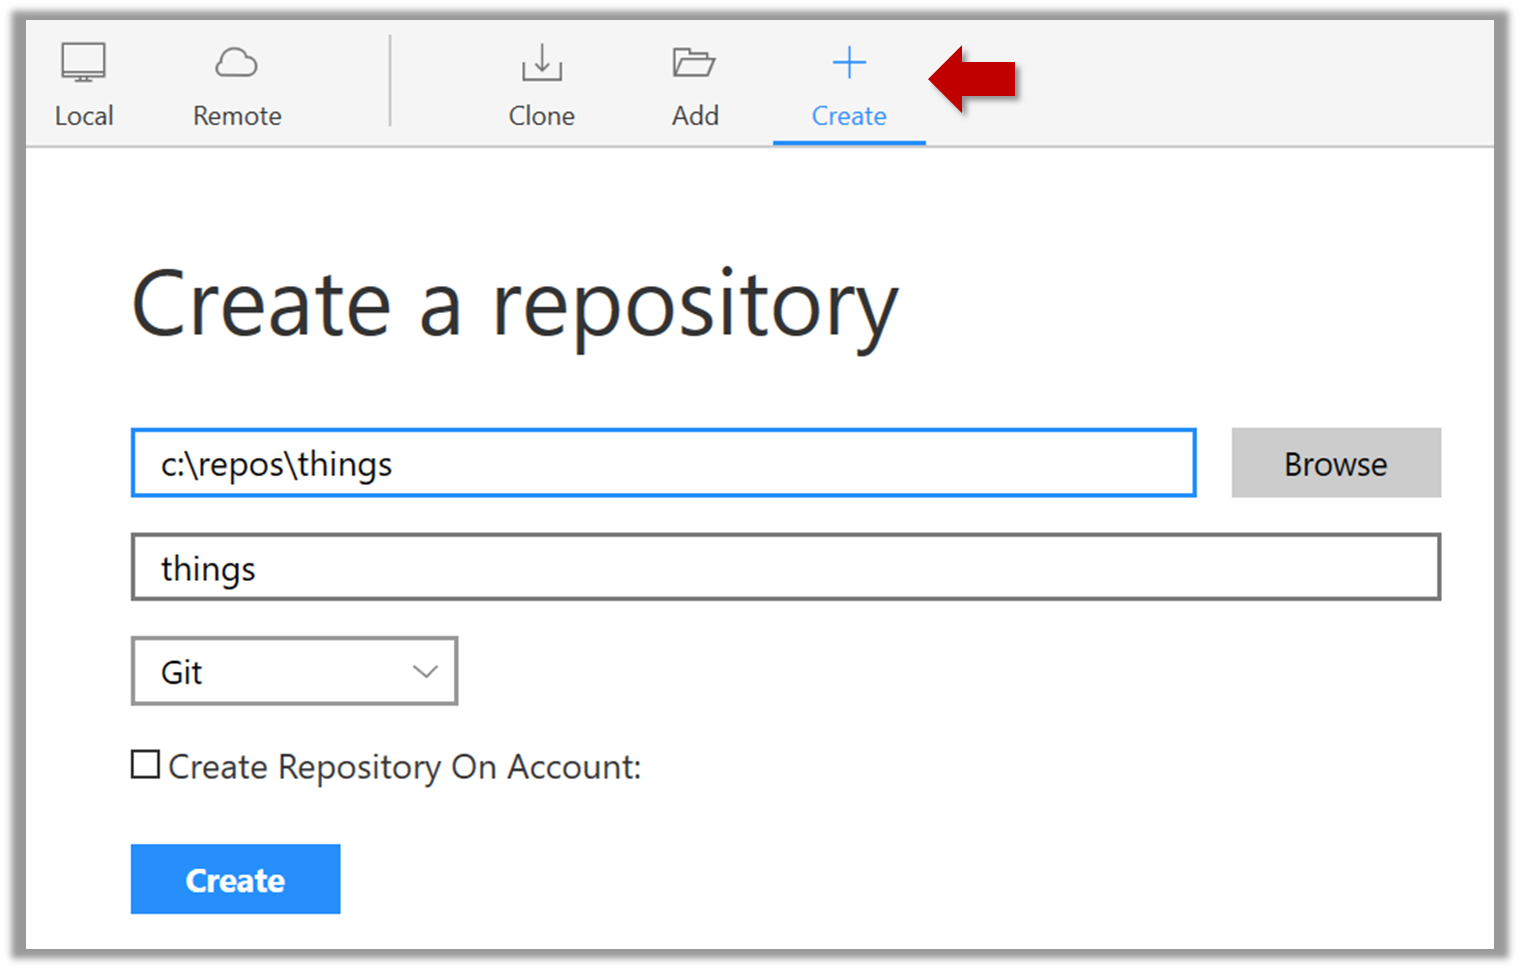
Windows: Click File → Clone/New…. Click on Create button.
Mac: New... → Create New Repository.
Enter the location of the directory (Windows version shown below) and click Create.
Go to the things folder and observe how a hidden folder .git has been created.
Windows: you might have to configure Windows Explorer to show hidden files.
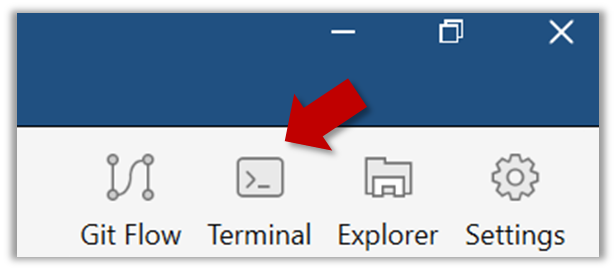
Open a Git Bash Terminal.
If you installed Sourcetree, you can click the Terminal button to open a GitBash terminal (on a Linux/Mac environment, even a regular terminal should do).
Navigate to the things directory.
Use the command git init which should initialize the repo.
$ cd /c/repos/things
$ git init
Initialized empty Git repository in c:/repos/things/.git/
You can use the list all command ls -a to view all files, which should show the .git directory that was created by the previous command.
$ ls -a
.  ..  .git
You can also use the git status command to check the status of the newly-created repo. It should respond with something like the following:
$ git status
# On branch master
#
# No commits yet
#
nothing to commit (create/copy files and use "git add" to track)
As you see above, this textbook explains how to use Git via Sourcetree (a GUI client) as well as via the Git CLI. If you are new to Git, we recommend you learn both the GUI method and the CLI method -- The GUI method will help you visualize the result better while the CLI method is more universal (i.e., you will not be tied to any GUI) and more flexible/powerful.
It is fine to learn the CLI way only (using Sourcetree is optional), especially if you normally prefer to work with CLI over GUI.
[Textbook location: Tools → Git and GitHub → commit: Saving changes to history]
Can commit using Git
After initializing a repository, Git can help you with revision controlling files inside the working directory. However, it is not automatic. You need to tell Git which of your changes (aka revisions) should be committed to its memory for later use. Saving changes into Git's memory in that way is called committing and a change saved to the revision history is called a commit.
Here are the steps you can follow to learn how to create Git commits:
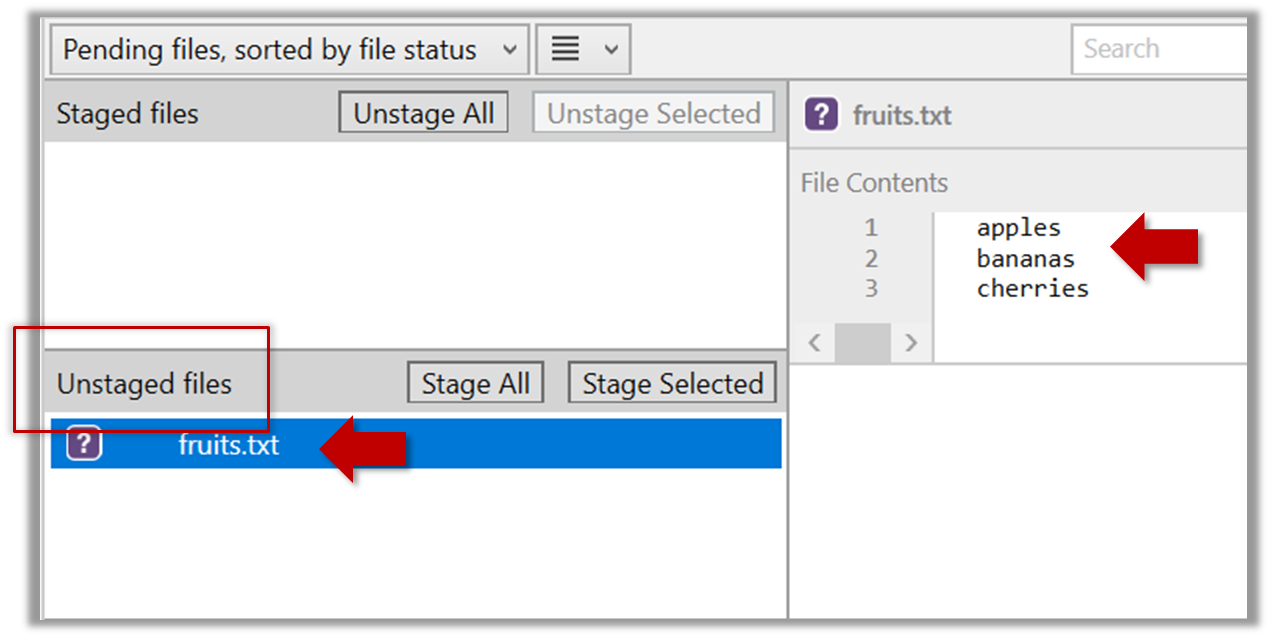
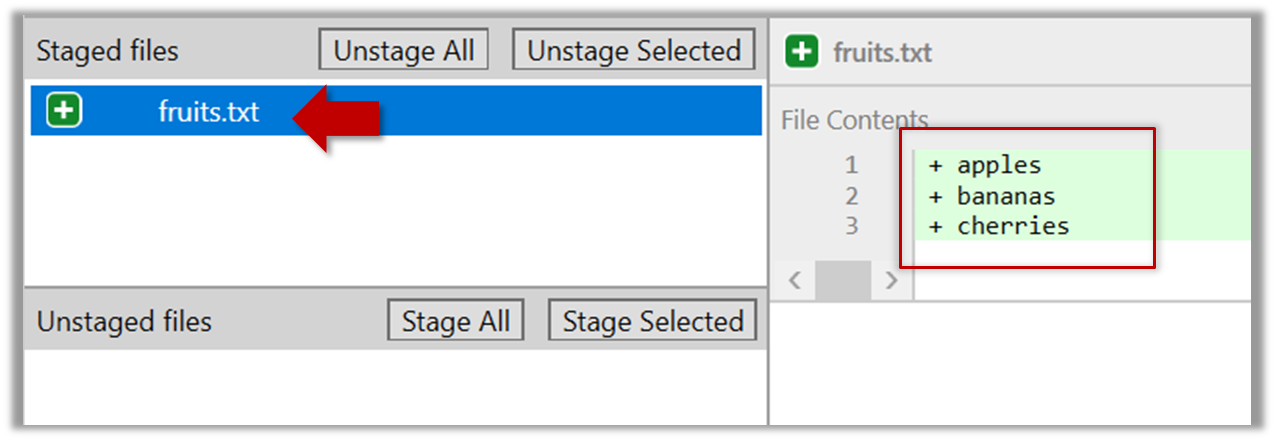
1. Do some changes to the content inside the working directory e.g., create a file named fruits.txt in the things directory and add some dummy text to it.
2. Observe how the file is detected by Git.
The file is shown as ‘unstaged’.
You can use the git status command to check the status of the working directory.
$ git status
# On branch master
#
# No commits yet
#
# Untracked files:
#   (use "git add <file>..." to include in what will be committed)
#
#   a.txt
nothing added to commit but untracked files present (use "git add" to track)
3. Stage the changes to commit: Although Git has detected the file in the working directory, it will not do anything with the file unless you tell it to. Suppose you want to commit the current changes to the file. First, you should stage the file, which is how you tell Git which changes you want to include in the next commit.
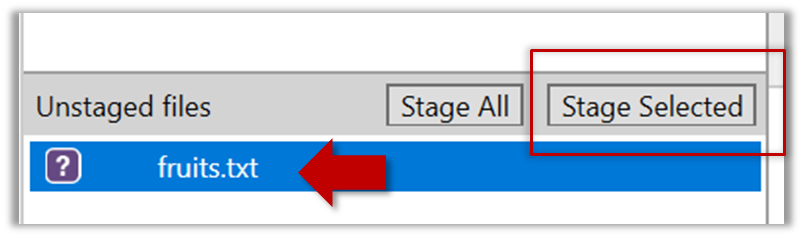
Select the fruits.txt and click on the Stage Selected button.
fruits.txt should appear in the Staged files panel now.
If Sourcetree shows a \ No newline at the end of the file message below the staged lines (i.e., below the cherries line in the above screenshot), that is because you did not hit enter after entering the last line of the file (hence, Git is not sure if that line is complete). To rectify, move the cursor to end of the last line in that file and hit enter (like you are adding a blank line below it). This new change will now appear as an 'unstaged' change. Stage it as well.
You can use the stage or the add command (they are synonyms, add is the more popular choice) to stage files.
$ git add fruits.txt
$ git status
# On branch master
#
# No commits yet
#
# Changes to be committed:
#   (use "git rm --cached <file>..." to unstage)
#
#       new file:   fruits.txt
#
4. Commit the staged version of fruits.txt.
Click the Commit button, enter a commit message e.g. add fruits.txt into the text box, and click Commit.
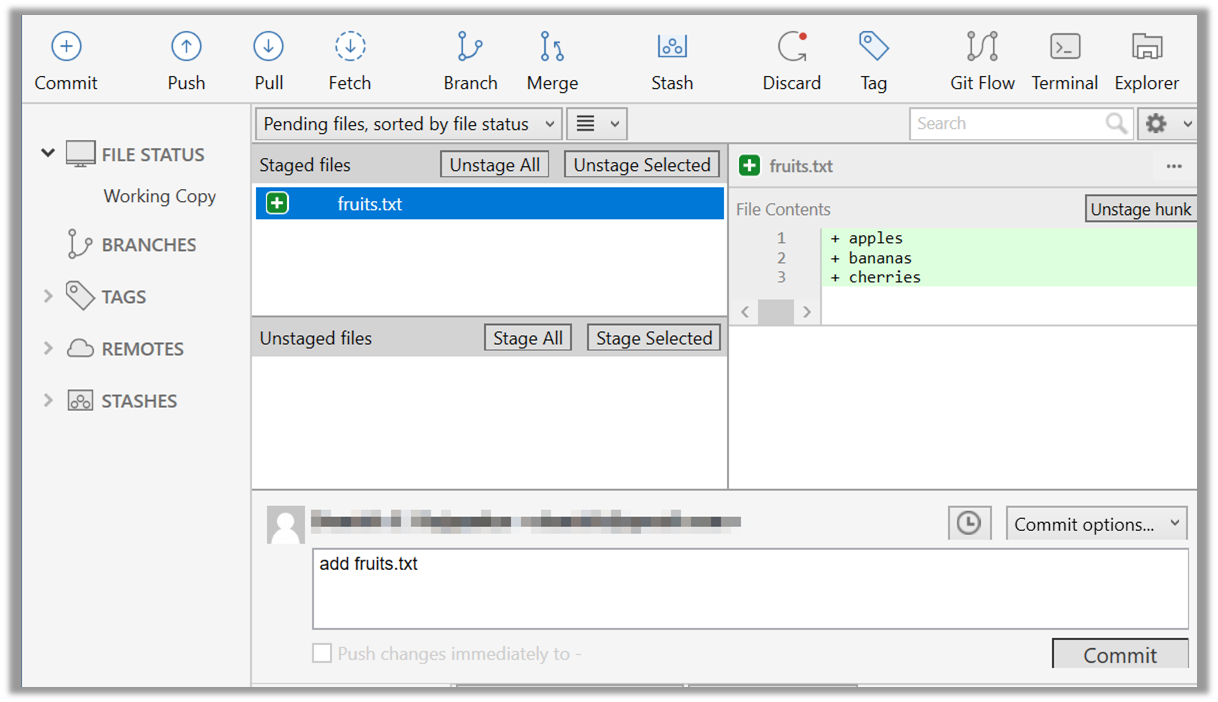
Use the commit command to commit. The -m switch is used to specify the commit message.
$ git commit -m "Add fruits.txt"
You can use the log command to see the commit history.
$ git log
commit 8fd30a6910efb28bb258cd01be93e481caeab846
Author: … < … @... >
Date:   Wed Jul 5 16:06:28 2017 +0800

  Add fruits.txt
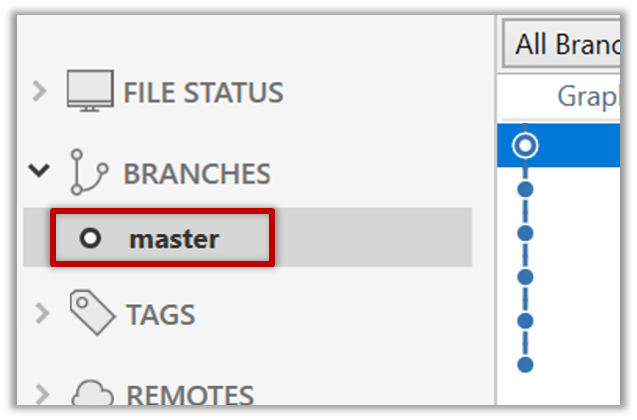
Note the existence of something called the master branch. Git uses a mechanism called branches to facilitate evolving file content in parallel (we'll learn git branching in a later topic). Furthermore, Git auto-creates a branch named master on which the commits go on by default.
Expand the BRANCHES menu and click on the master to view the history graph, which contains only one node at the moment, representing the commit you just added. Also note a label master attached to the commit.
This label points to the latest commit on the master branch.
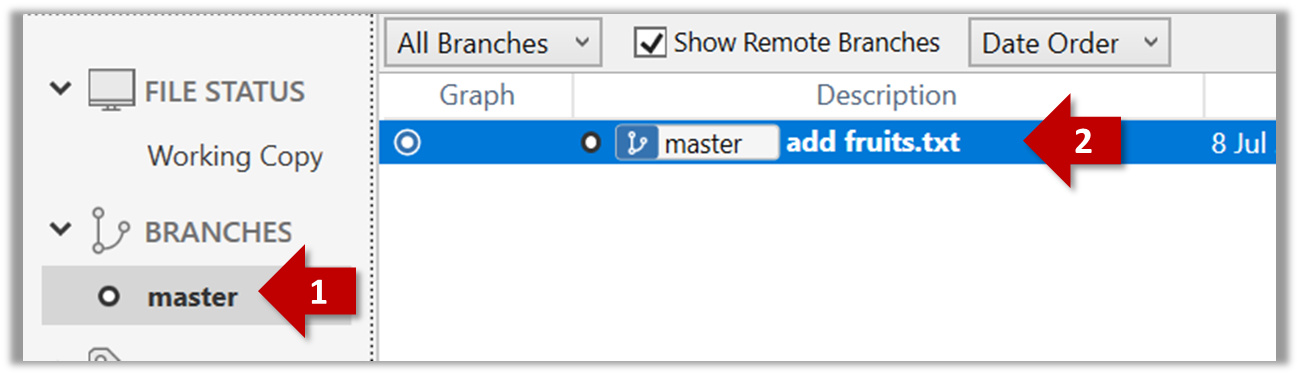
Run the git status command and note how the output contains the phrase on branch master.
5. Do a few more commits.
Make some changes to
fruits.txt(e.g. add some text and delete some text). Stage the changes, and commit the changes using the same steps you followed before. You should end up with something like this.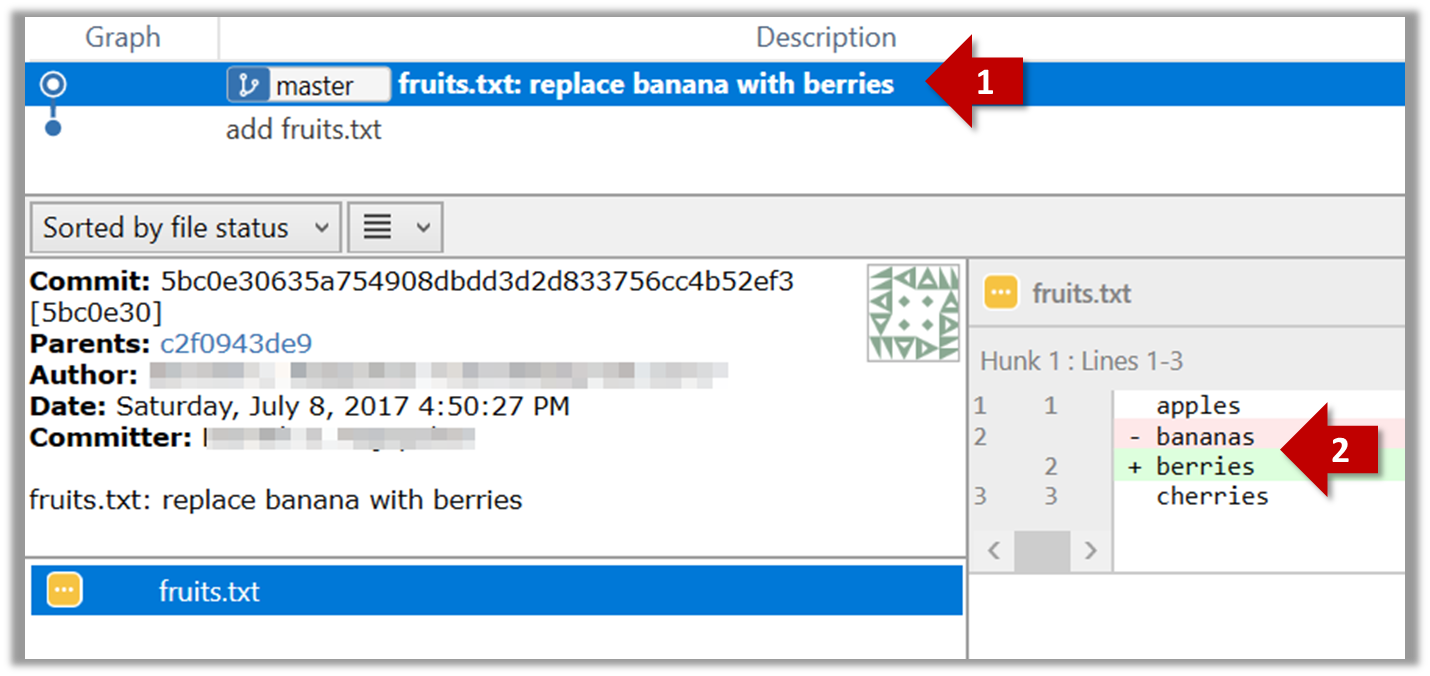
Next, add two more files
colors.txtandshapes.txtto the same working directory. Add a third commit to record the current state of the working directory.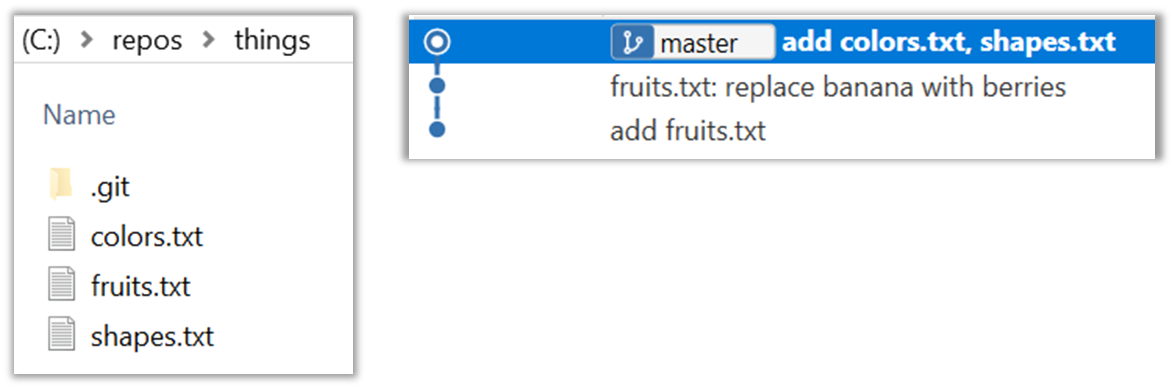
You can decide what to stage and what to leave unstaged. When staging changes to commit, you can leave some files unstaged, if you wish to not include them in the next commit. In fact, Git even allows some changes in a file to be staged, while other changes in the same file to be unstaged. This flexibility is particularly useful when you want to put all related changes into a commit while leaving out unrelated changes.
6. See the revision graph: Note how commits form a path-like structure aka the revision tree/graph. In the revision graph, each commit is shown as linked to its 'parent' commit (i.e., the commit before it).
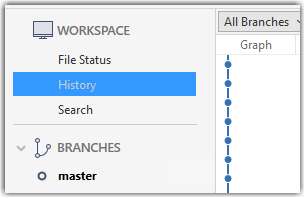
To see the revision graph, click on the History item (listed under the WORKSPACE section) on the menu on the right edge of Sourcetree.
The gitk command opens a rudimentary graphical view of the revision graph.
How do undo/delete a commit?
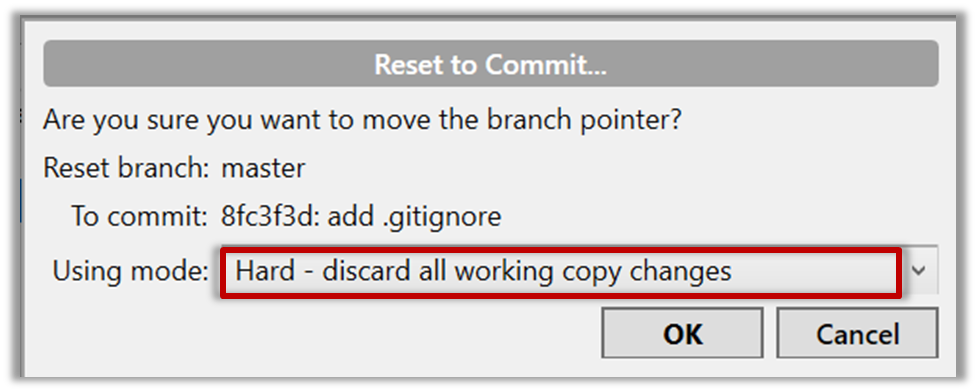
To undo the last commit, right-click on the commit just before it, and choose Reset current branch to this commit.
In the next dialog, choose the mode Mixed - keep working copy but reset index option. This will make the offending commit disappear but will keep the changes that you included in that commit intact.
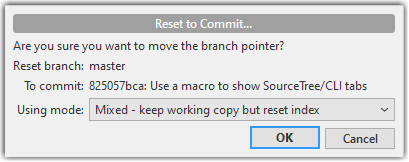
If you use the Soft - ... mode instead, the last commit will be undone as before, but the changes included in that commit will stay in the staging area.
To delete the last commit entirely (i.e., undo the commit and also discard the changes included in that commit), do as above but choose the Hard - ... mode instead.
To undo/delete last n commits, right-click on the commit just before the last n commits, and do as above.
To undo the last commit, but keep the changes in the staging area, use the following command.
$ git reset --soft HEAD~1
To undo the last commit, and remove the changes from the staging area (but not discard the changes), used --mixed instead of --soft.
$ git reset --mixed HEAD~1
To delete the last commit entirely (i.e., undo the commit and also discard the changes included in that commit), do as above but use the --hard flag instead (i.e., do a hard reset).
$ git reset --hard HEAD~1
To undo/delete last n commits: HEAD~1 is used to tell Git you are targeting the commit one position before the latest commit -- in this case the target commit is the one we want to reset to, not the one we want to undo (as the command used is reset). To undo/delete two last commits, you can use HEAD~2, and so on.
Phase 2: Using Revision History
In this phase, you'll learn how to make use of the revision history contained inside a Git repository.
[Textbook location: Tools → Git and GitHub → tag: Naming commits]
Can tag commits using Git
Each Git commit is uniquely identified by a hash e.g., d670460b4b4aece5915caf5c68d12f560a9fe3e4. As you can imagine, using such an identifier is not very convenient for our day-to-day use. As a solution, Git allows adding a more human-readable tag to a commit e.g., v1.0-beta.
Here's how you can tag a commit in a local repo:
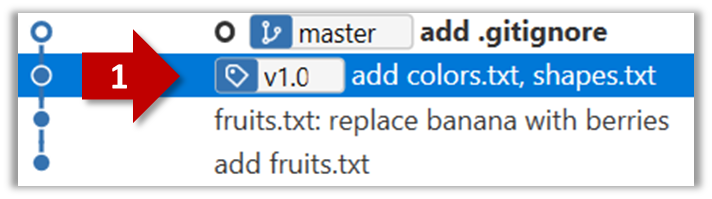
Right-click on the commit (in the graphical revision graph) you want to tag and choose Tag….
Specify the tag name e.g. v1.0 and click Add Tag.
The added tag will appear in the revision graph view.
To add a tag to the current commit as v1.0:
$ git tag v1.0
To view tags:
$ git tag
To learn how to add a tag to a past commit, go to the ‘Git Basics – Tagging’ page of the git-scm book and refer the ‘Tagging Later’ section.
After adding a tag to a commit, you can use the tag to refer to that commit, as an alternative to using the hash.
Annotated vs Lightweight Tags: The Git tags explained above are known as lightweight tags. There is another type of Git tags called annotated tags. See git-scm.com/book for more info.
Tags are different from commit messages, in purpose and in form. A commit message is a description of the commit that is part of the commit itself. A tags is a short name for a commit, which exists as a separate entity that points to a commit.
[Textbook location: Tools → Git and GitHub → diff: Comparing revisions]
Can compare git revisions
Git can show you what changed in each commit.
To see which files changed in a commit, click on the commit. To see what changed in a specific file in that commit, click on the file name.
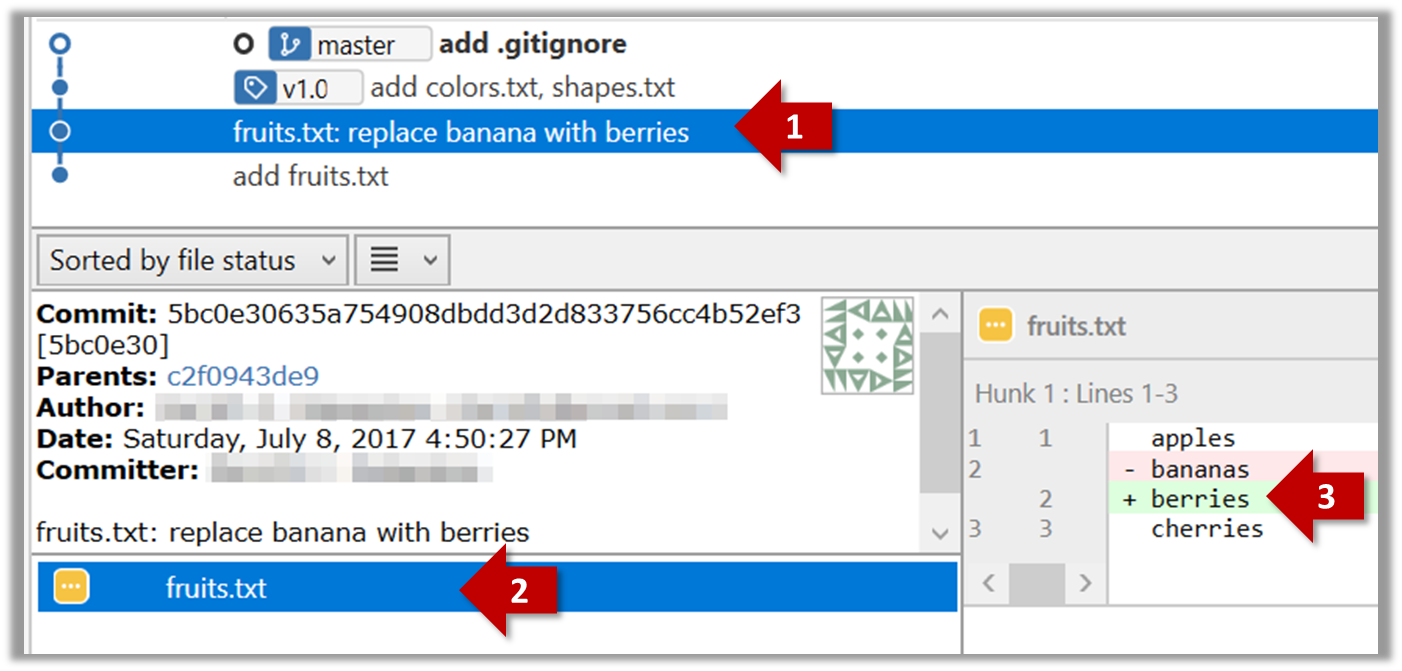
$ git show < part-of-commit-hash >
Example:
$ git show 5bc0e306
commit 5bc0e30635a754908dbdd3d2d833756cc4b52ef3
Author: … < … >
Date:   Sat Jul 8 16:50:27 2017 +0800

    fruits.txt: replace banana with berries

diff --git a/fruits.txt b/fruits.txt
index 15b57f7..17f4528 100644
--- a/fruits.txt
+++ b/fruits.txt
@@ -1,3 +1,3 @@
 apples
-bananas
+berries
 cherries
Git can also show you the difference between two points in the history of the repo.
Select the two points you want to compare using Ctrl+Click. The differences between the two selected versions will show up in the bottom half of Sourcetree, as shown in the screenshot below.
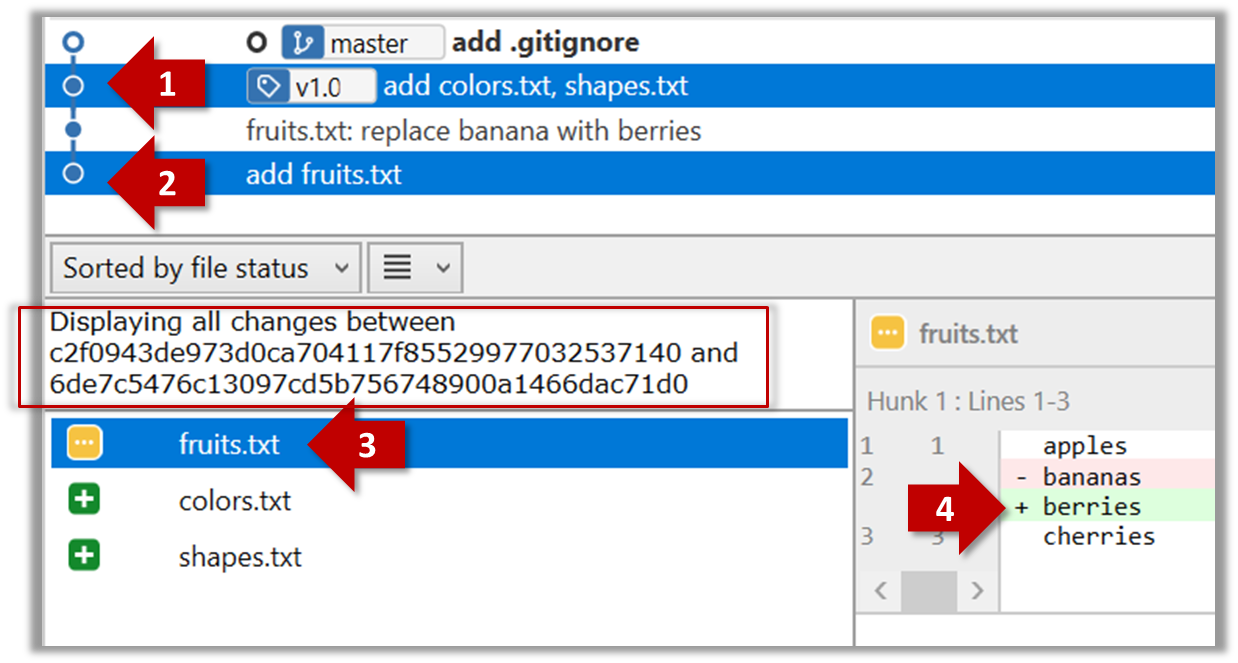
The same method can be used to compare the current state of the working directory (which might have uncommitted changes) to a point in the history.
The diff command can be used to view the differences between two points of the history.
git diff: shows the changes (uncommitted) since the last commit.git diff 0023cdd..fcd6199: shows the changes between the points indicated by commit hashes.
Note that when using a commit hash in a Git command, you can use only the first few characters (e.g., first 7-10 chars) as that's usually enough for Git to locate the commit.git diff v1.0..HEAD: shows changes that happened from the commit tagged asv1.0to the most recent commit.
[Textbook location: Tools → Git and GitHub → checkout: Retrieving a specific revision]
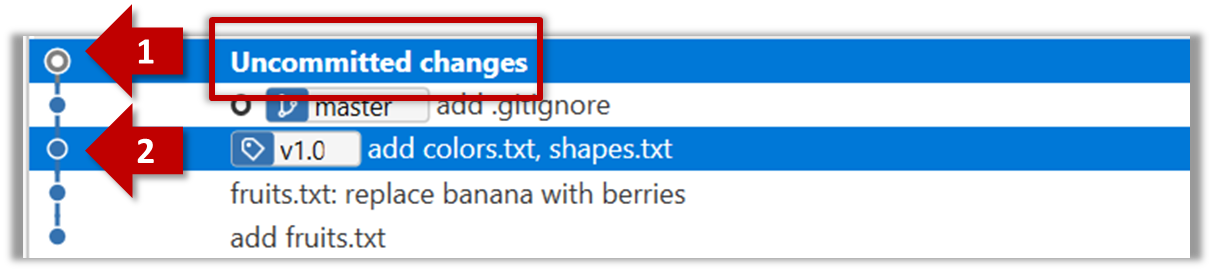
Can load a specific version of a Git repo
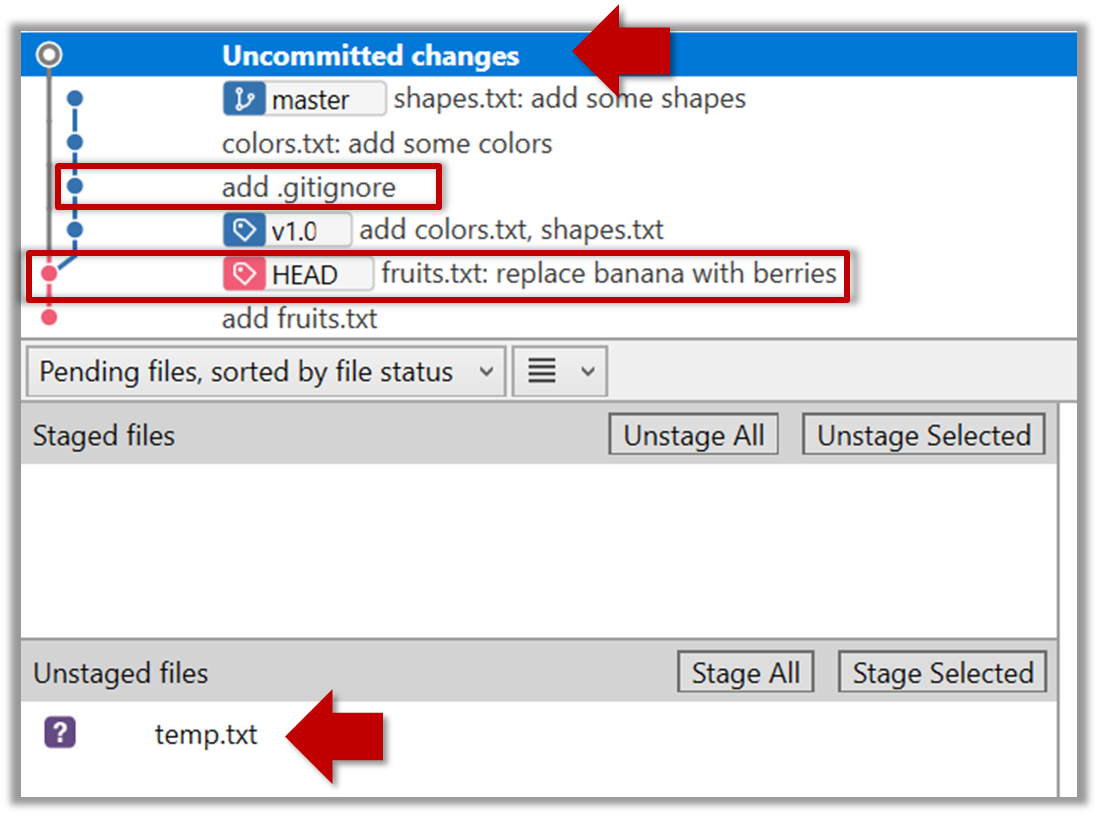
Git can load a specific version of the history to the working directory. Note that if you have uncommitted changes in the working directory, you need to stash them first to prevent them from being overwritten.
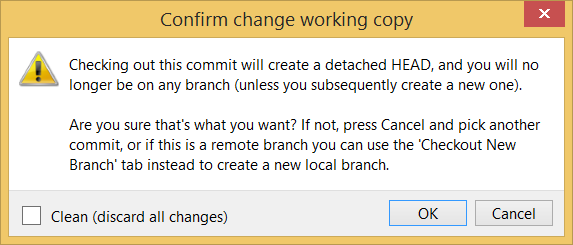
Double-click the commit you want to load to the working directory, or right-click on that commit and choose Checkout....
Click OK to the warning about ‘detached HEAD’ (similar to below).
The specified version is now loaded to the working folder, as indicated by the HEAD label. HEAD is a reference to the currently checked out commit.
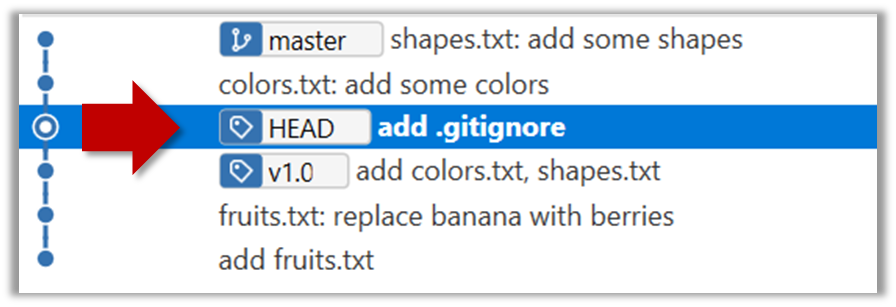
If you checkout a commit that comes before the commit in which you added the .gitignore file, Git will now show ignored files as ‘unstaged modifications’ because at that stage Git hasn’t been told to ignore those files.
To go back to the latest commit, double-click it.
Use the checkout <commit-identifier> command to change the working directory to the state it was in at a specific past commit.
git checkout v1.0: loads the state as at commit taggedv1.0git checkout 0023cdd: loads the state as at commit with the hash0023cddgit checkout HEAD~2: loads the state that is 2 commits behind the most recent commit
For now, you can ignore the warning about ‘detached HEAD’.
Phase 3: Working With Remote Repos
In this phase, you'll start interacting with git repositories hosted on remote servers.
[Textbook location: Tools → Git and GitHub → pull, fetch: Downloading data from other repos]
Can pull changes from a repo
Here's a scenario you can try in order to learn how to pull commits from another repo to yours.
1. Clone a repo (e.g., the repo used in [Git & GitHub → Clone]) to be used for this activity.
2. Delete the last few commits to simulate cloning the repo a few commits ago.
Right-click the target commit (i.e. the commit that is 2 commits behind the tip) and choose Reset current branch to this commit.

Choose the Hard - … option and click OK.
This is what you will see.
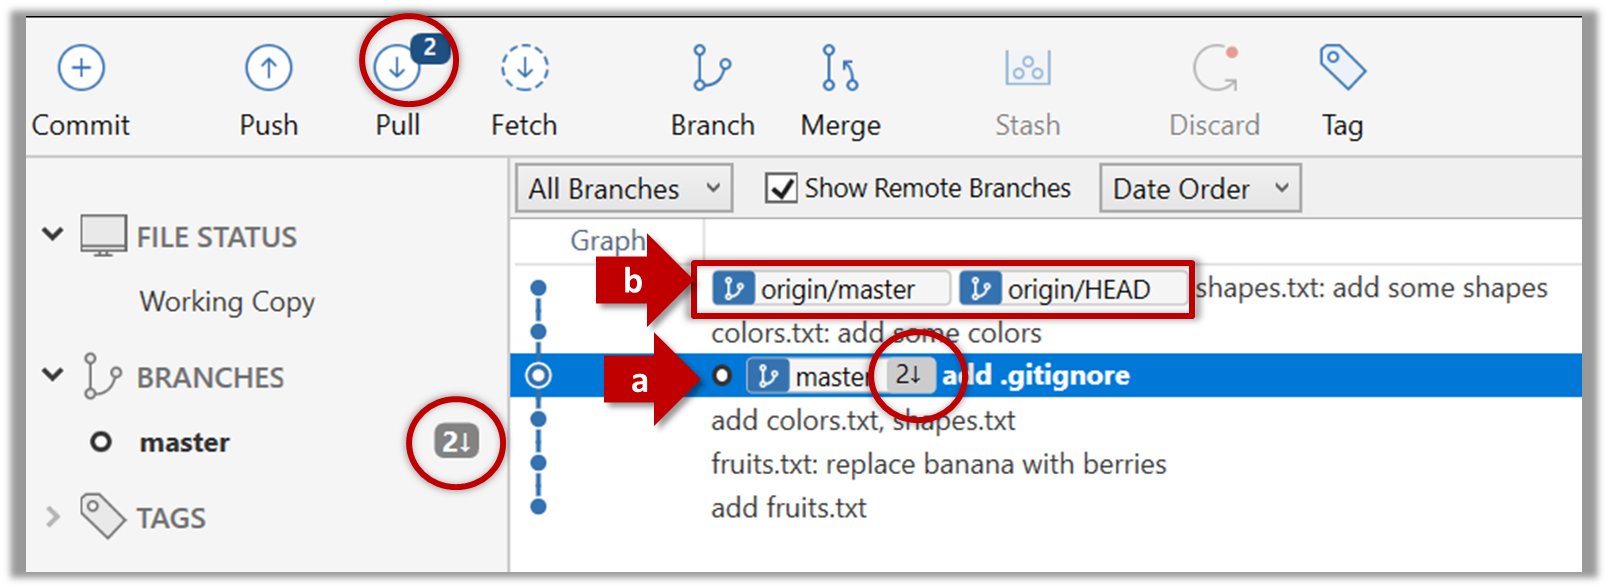
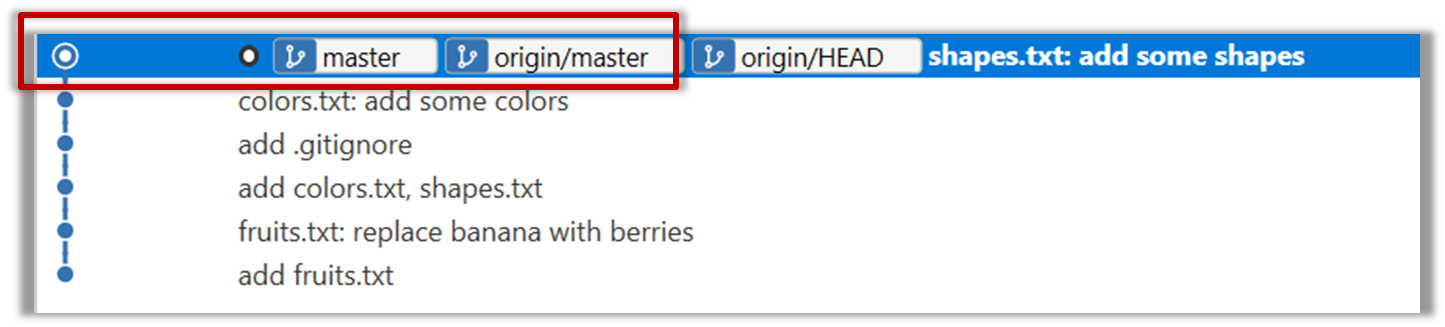
Note the following (cross-refer the screenshot above):
Arrow marked as a: The local repo is now at this commit, marked by the master label.
Arrow marked as b: The origin/master label shows what is the latest commit in the master branch in the remote repo. origin is the default name given to the upstream repo you cloned from.
Use the reset command to delete commits at the tip of the revision history.
$ git reset --hard HEAD~2
More info on the git reset command can be found here.
Now, your local repo state is exactly how it would be if you had cloned the repo 2 commits ago, as if somebody has added two more commits to the remote repo since you cloned it.
3. Pull from the other repo: To get those missing commits to your local repo (i.e. to sync your local repo with upstream repo) you can do a pull.
Click the Pull button in the main menu, choose origin and master in the next dialog, and click OK.
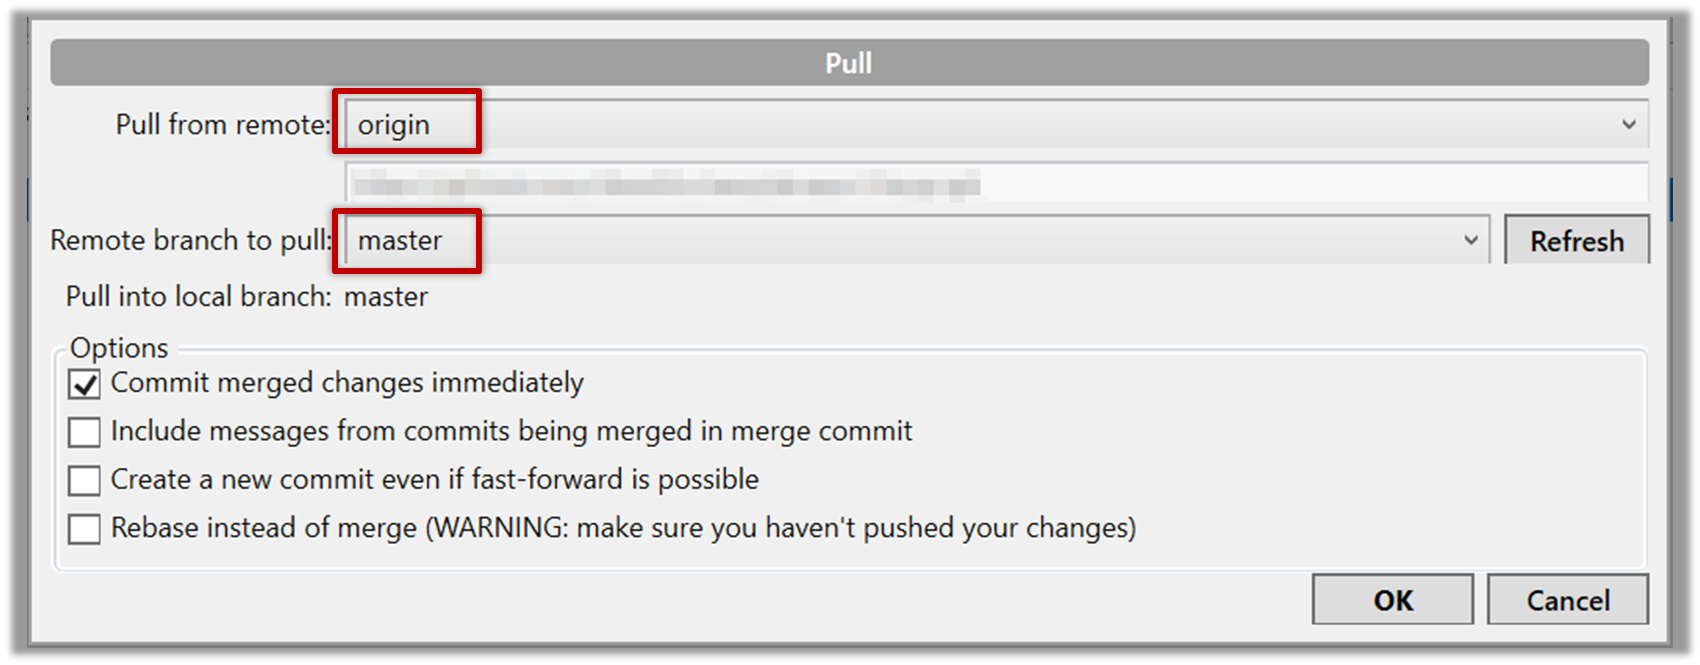
Now you should see something like this where master and origin/master are both pointing the same commit.
$ git pull origin
You can also do a fetch instead of a pull in which case the new commits will be downloaded to your repo but the working directory will remain at the current commit. To move the current state to the latest commit that was downloaded, you need to do a merge. A pull is a shortcut that does both those steps in one go.
Working with multiple remotes
When you clone a repo, Git automatically adds a remote repo named origin to your repo configuration. As you know, you can pull commits from that repo. As you know, a Git repo can work with remote repos other than the one it was cloned from.
To communicate with another remote repo, you can first add it as a remote of your repo. Here is an example scenario you can follow to learn how to pull from another repo:
Open the local repo in Sourcetree. Suggested: Use your local clone of the
samplerepo-thingsrepo.Choose
Repository→Repository Settingsmenu option.Add a new remote to the repo with the following values.
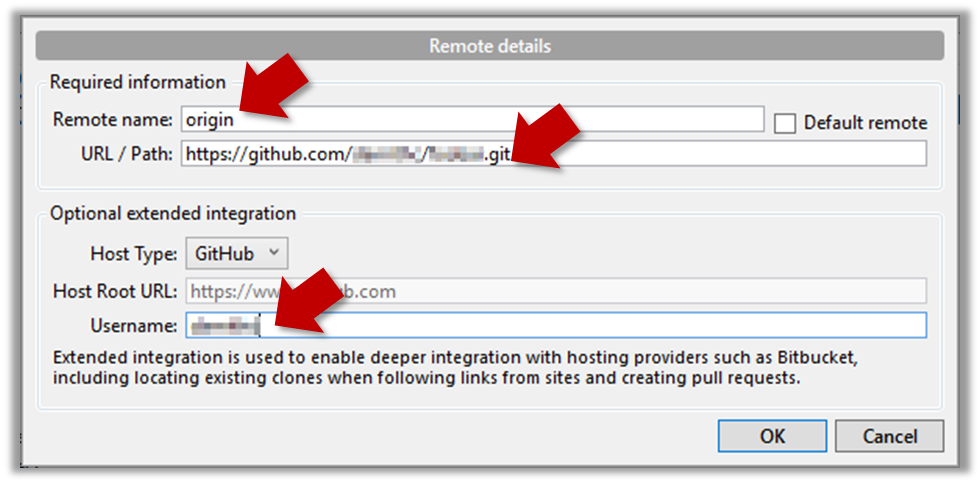
Remote name: the name you want to assign to the remote repo e.g.,upstream1URL/path: the URL of your repo (ending in.git) that. Suggested:https://github.com/se-edu/samplerepo-things-2.git(samplerepo-things-2is another repo that has a shared history withsamplerepo-things)Username: your GitHub username
Now, you can fetch or pull (pulling will fetch the branch and merge the new code to the current branch) from the added repo as you did before but choose the remote name of the repo you want to pull from (instead of
origin):
Click theFetchbutton or thePullbutton first.
If the
Remote branch to pulldropdown is empty, click theRefreshbutton on its right.If the pull from the
samplerepo-things-2was successful, you should have received one more commit into your local repo.
Navigate to the folder containing the local repo.
Set the new remote repo as a remote of the local repo.
command:git remote add {remote_name} {remote_repo_url}
e.g.,git remote add upstream1 https://github.com/johndoe/foobar.gitNow you can fetch or pull (pulling will fetch the branch and merge the new code to the current branch) from the new remote.
e.g.,git fetch upstream1 masterfollowed bygit merge upstream1/master, or,
git pull upstream1 master
[Textbook location: Tools → Git and GitHub → Fork: Creating a remote copy]
Can fork a repo
Given below is a scenario you can try in order to learn how to fork a repo:.
0. Create a GitHub account if you don't have one yet.
1. Go to the GitHub repo you want to fork e.g., samplerepo-things
2. Click on the  button on the top-right corner. In the next step,
- choose to fork to your own account or to another GitHub organization that you are an admin of.
- Un-tick the
[ ] Copy the master branch onlyoption, so that you get copies of other branches (if any) in the repo.
As you might have guessed from the above, forking is not a Git feature, but a feature provided by remote Git hosting services such as Github.
GitHub does not allow you to fork the same repo more than once to the same destination. If you want to re-fork, you need to delete the previous fork.
[Textbook location: Tools → Git and GitHub → push: Uploading data to other repos]
Can push to a remote repo
Given below is a scenario you can try in order to learn how to push commits to a remote repo hosted on GitHub:
1. Fork an existing GitHub repo (e.g., samplerepo-things) to your GitHub account.
2. Clone the fork (not the original) to your computer.
3. Commit some changes in your local repo.
4. Push the new commits to your fork on GitHub
Click the Push button on the main menu, ensure the settings are as follows in the next dialog, and click the Push button on the dialog.
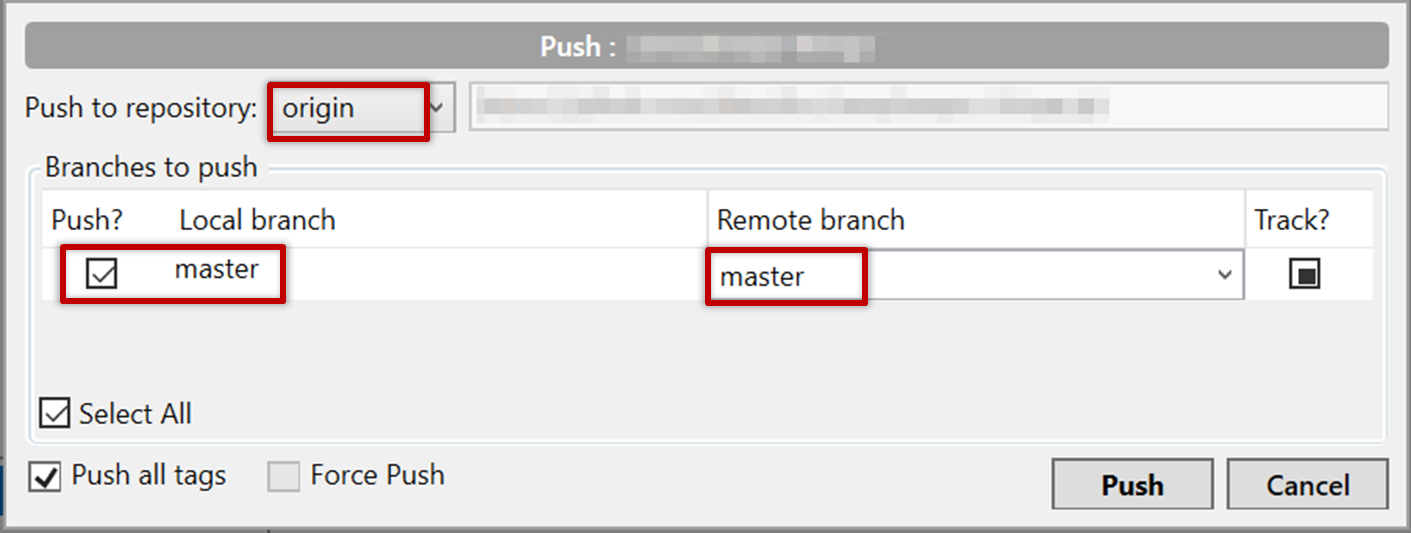
Use the command git push origin master. Enter your Github username and password when prompted.
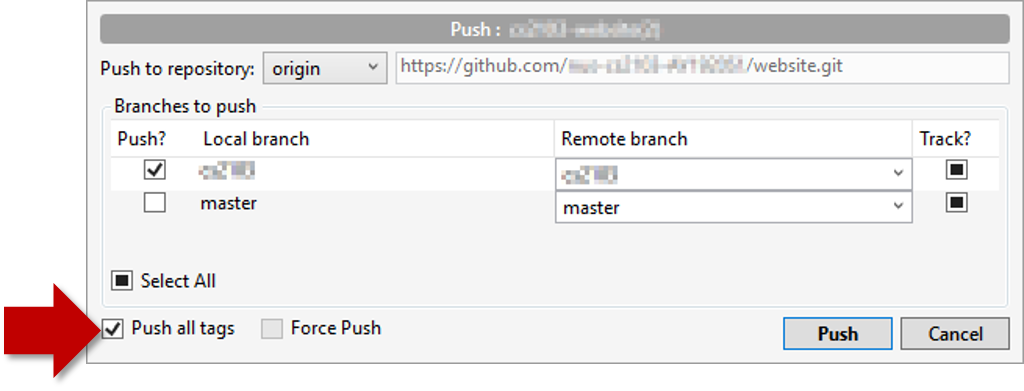
5. Add a few more commits, and tag some of them.
6. Push the new commits and the tags.
Push similar to before, but ensure the [ ] Push all tags option in the push dialog is ticked as well.
A normal push does not include tags. After pushing the commits (as before), push tags to the repo as well:
To push a specific tag:
$ git push origin v1.0b
To push all tags:
$ git push origin --tags
You can push to repos other than the one you cloned from, as long as the target repo and your repo have a shared history.
- Add the GitHub repo URL as a remote, if you haven't done so already.
- Push to the target repo.
Push your repo to the new remote the usual way, but select the name of target remote instead of origin and remember to select the Track checkbox.
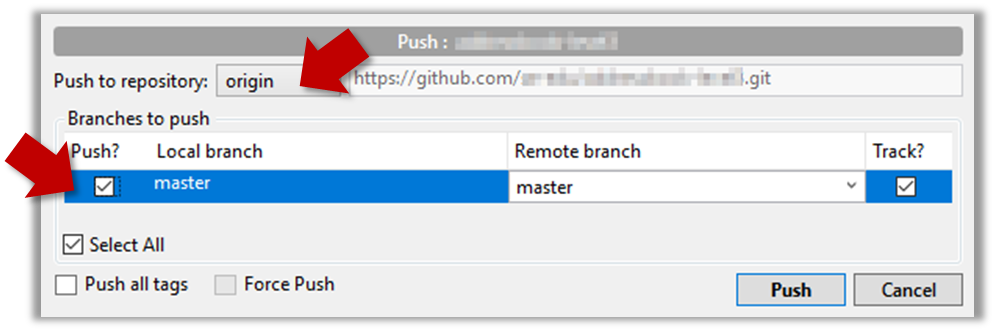
Push to the new remote the usual way e.g., git push upstream1 master (assuming you gave the name upstream1 to the remote).
You can even push an entire local repository to GitHub, to form an entirely new remote repository. For example, you created a local repo and worked with it for a while but now you want to upload it onto GitHub (as a backup or to share it with others). The steps are given below.
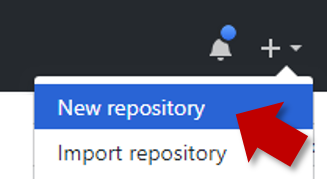
1. Create an empty remote repo on GitHub.
Login to your GitHub account and choose to create a new Repo.
In the next screen, provide a name for your repo but keep the
Initialize this repo ...tick box unchecked.
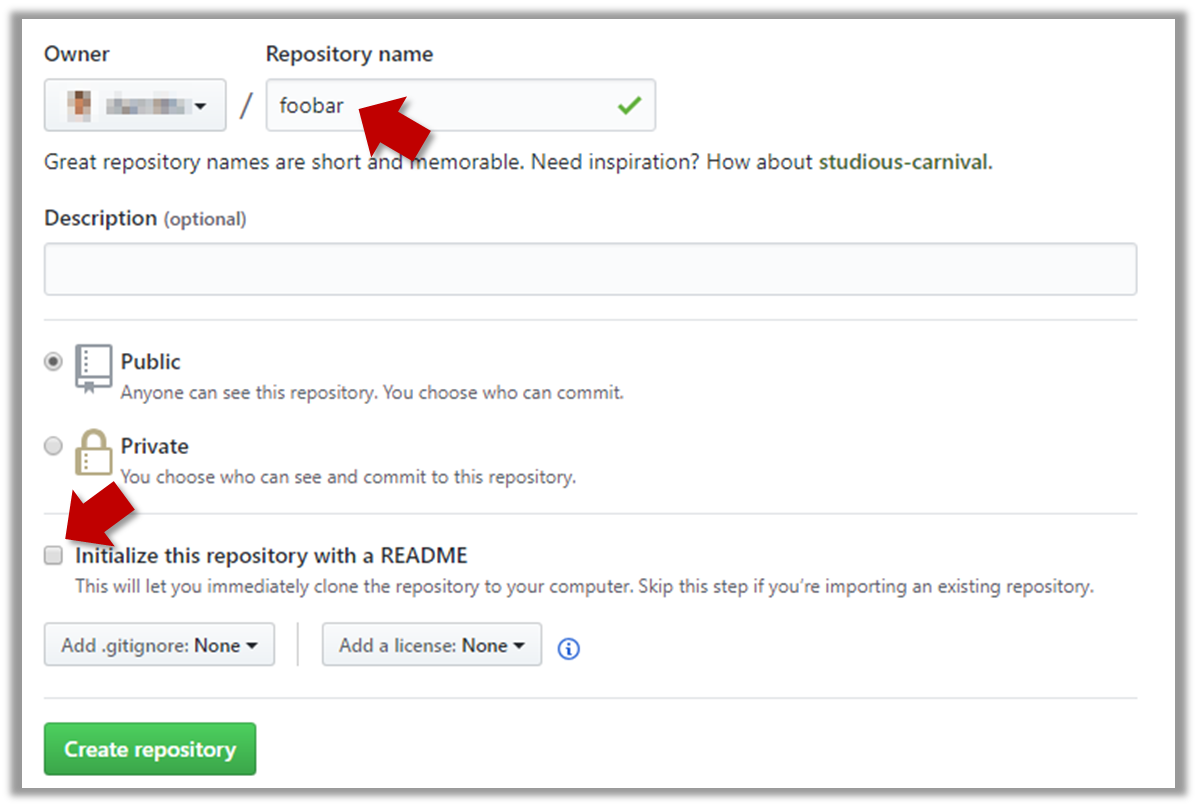
Note the URL of the repo. It will be of the form
https://github.com/{your_user_name}/{repo_name}.git.
e.g.,https://github.com/johndoe/foobar.git(note the.gitat the end)
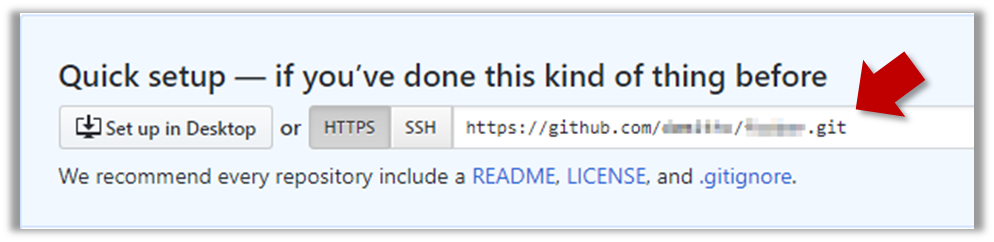
2. Add the GitHub repo URL as a remote of the local repo. You can give it the name origin (or any other name).
3. Push the repo to the remote.
Push each branch to the new remote the usual way but use the -u flag to inform Git that you wish to the branch.
e.g., git push -u origin master
Phase 4: Working With Branches
In this phase, you'll learn how to use Git branches to track code changes done in parallel.
[Textbook location: Project Management → Revision Control → Branching]
Can explain branching
Branching is the process of evolving multiple versions of the software in parallel. For example, one team member can create a new branch and add an experimental feature to it while the rest of the team keeps working on another branch. Branches can be given names e.g. master, release, dev.
A branch can be merged into another branch. Merging usually results in a new commit that represents the changes done in the branch being merged.
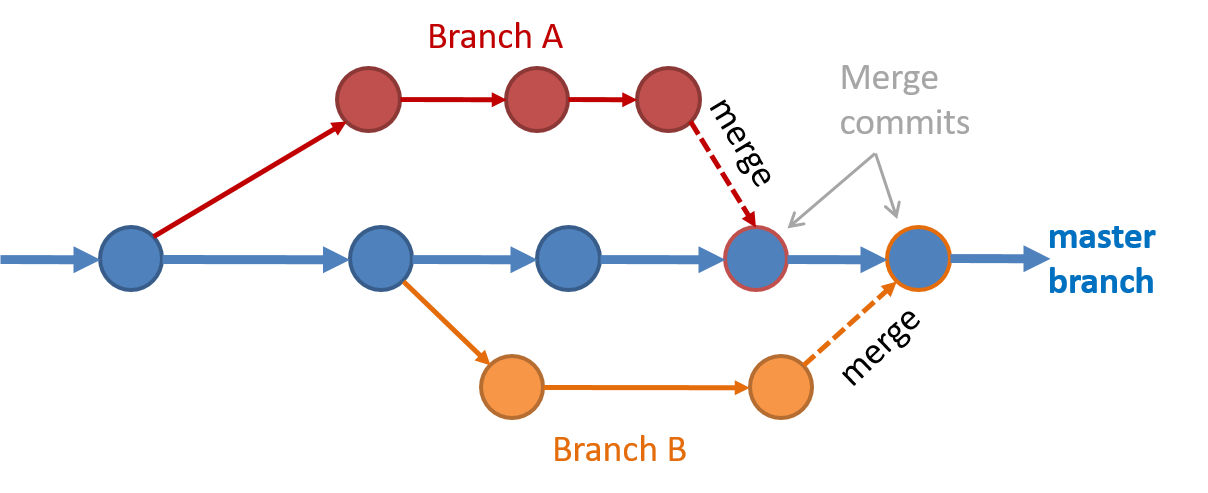 Branching and merging
 Merge conflicts happen when you try to merge two branches that had changed the same part of the code and the RCS cannot decide which changes to keep. In those cases, you have to ‘resolve’ the conflicts manually.
[Textbook location: Tools → Git and GitHub → branch: Doing multiple parallel changes]
Can use Git branching
Git supports branching, which allows you to do multiple parallel changes to the content of a repository.
First, let us learn how the repo looks like as you perform branching operations.
A Git branch is simply a named label pointing to a commit. The HEAD label indicates which branch you are on. Git creates a branch named master by default. When you add a commit, it goes into the branch you are currently on, and the branch label (together with the HEAD label) moves to the new commit.
Given below is an illustration of how branch labels move as branches evolve. Refer to the text below it for explanations of each stage.
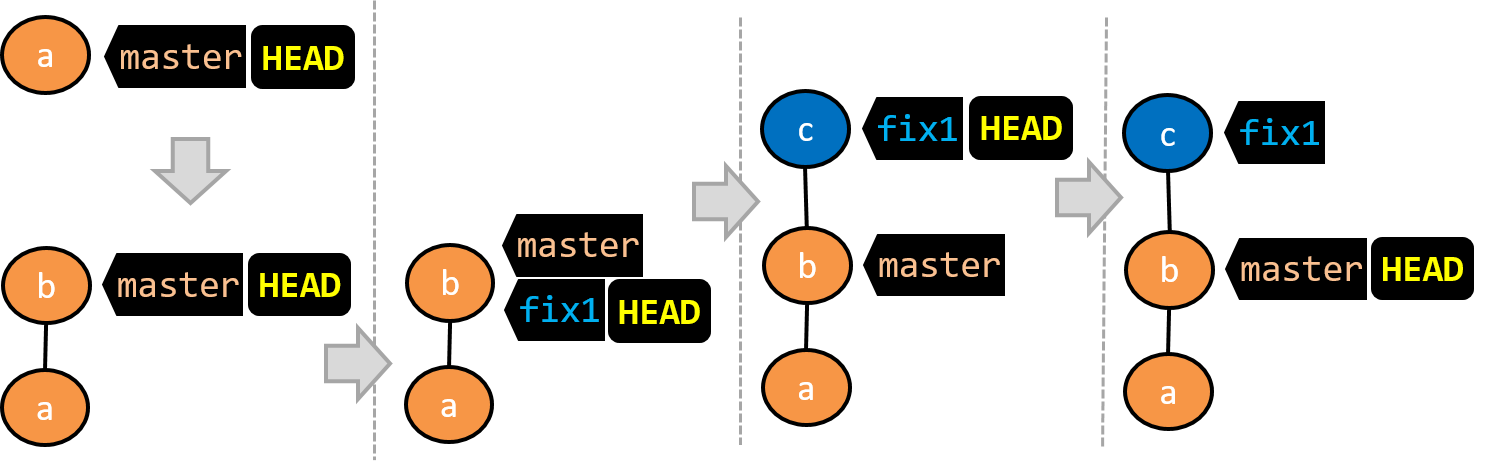
There is only one branch (i.e.,
master) and there is only one commit on it. TheHEADlabel is pointing to themasterbranch (as we are currently on that branch).To learn a bit more about how labels such as
masterandHEADwork, you can refer to this article.A new commit has been added. The
masterand theHEADlabels have moved to the new commit.A new branch
fix1has been added. The repo has switched to the new branch too (hence, theHEADlabel is attached to thefix1branch).A new commit (
c) has been added. The current branch labelfix1moves to the new commit, together with theHEADlabel.The repo has switched back to the
masterbranch. Hence, theHEADhas moved back tomasterbranch's .
At this point, the repo's working directory reflects the code at commitb(notc).
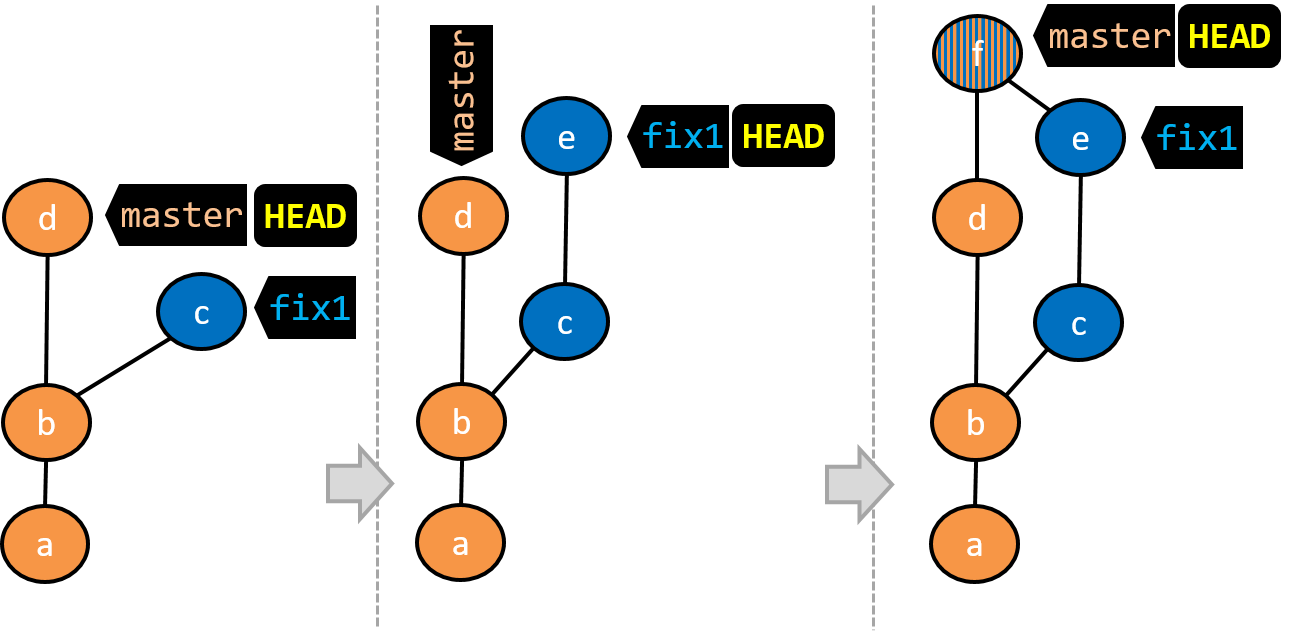
- A new commit (
d) has been added. Themasterand theHEADlabels have moved to that commit. - The repo has switched back to the
fix1branch and added a new commit (e) to it. - The repo has switched to the
masterbranch and thefix1branch has been merged into themasterbranch, creating a merge commitf. The repo is currently on themasterbranch.
Now that you have some idea how the repo will look like when branches are being used, let's follow the steps below to learn how to perform branching operations using Git. You can use any repo you have on your computer (e.g. a clone of the samplerepo-things) for this.
0. Observe that you are normally in the branch called master.
$ git status
on branch master
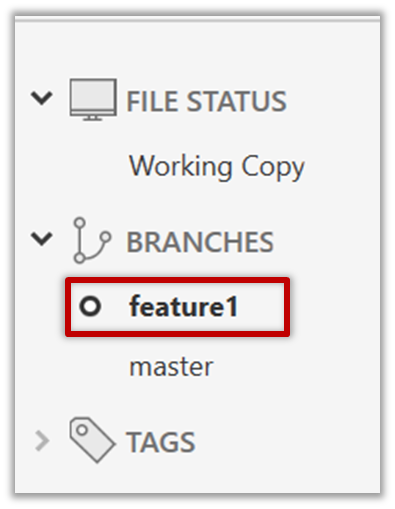
1. Start a branch named feature1 and switch to the new branch.
Click on the Branch button on the main menu. In the next dialog, enter the branch name and click Create Branch.
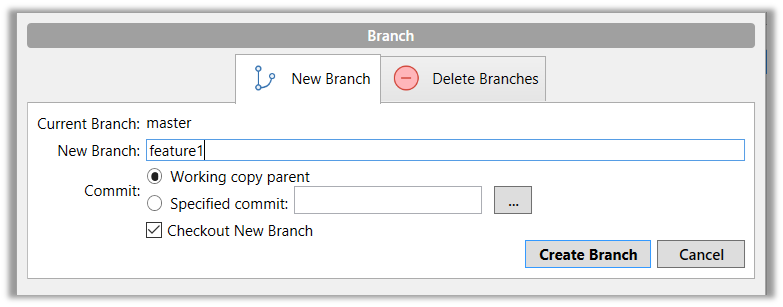
Note how the feature1 is indicated as the current branch (reason: Sourcetree automatically switches to the new branch when you create a new branch).
You can use the branch command to create a new branch and the checkout command to switch to a specific branch.
$ git branch feature1
$ git checkout feature1
One-step shortcut to create a branch and switch to it at the same time:
$ git checkout –b feature1
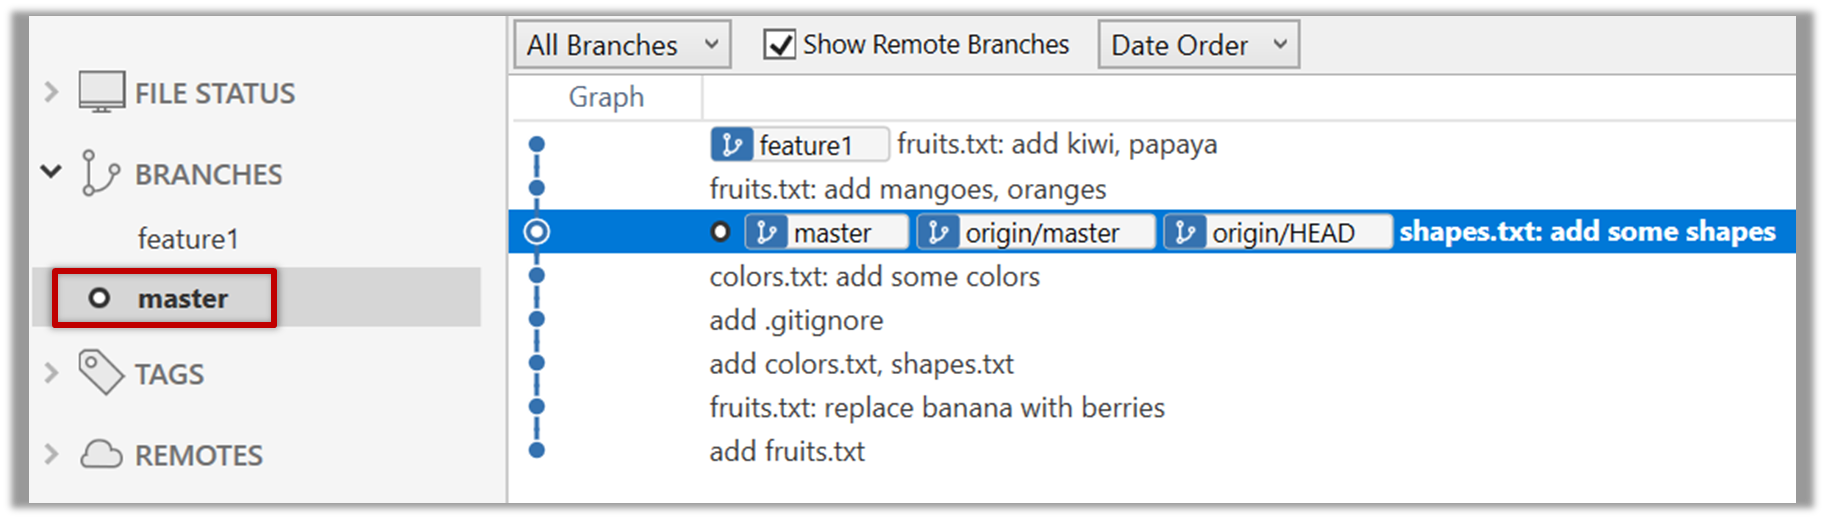
2. Create some commits in the new branch. Just commit as per normal. Commits you add while on a certain branch will become part of that branch.
Note how the master label and the HEAD label moves to the new commit (The HEAD label of the local repo is represented as in Sourcetree, as illustrated in the screenshot below).

3. Switch to the master branch. Note how the changes you did in the feature1 branch are no longer in the working directory.
Double-click the master branch.
$ git checkout master
4. Add a commit to the master branch. Let’s imagine it’s a bug fix.
To keep things simple for the time being, this commit should not involve the same content that you changed in the feature1 branch. To be on the safe side, you can change an entirely different file in this commit.
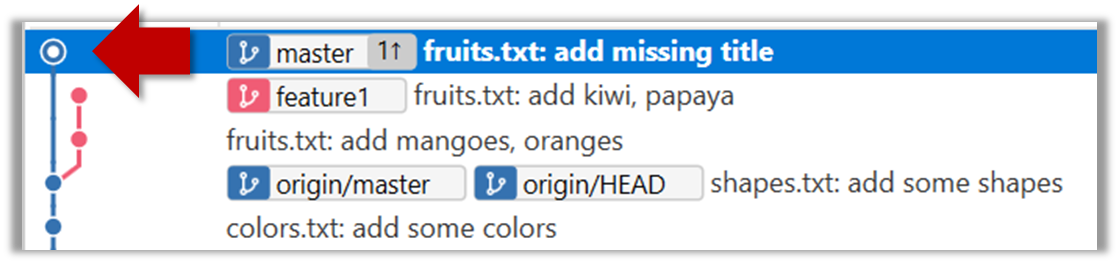
5. Switch back to the feature1 branch (similar to step 3).
6. Merge the master branch to the feature1 branch, giving an end-result like the following. Also note how Git has created a merge commit.
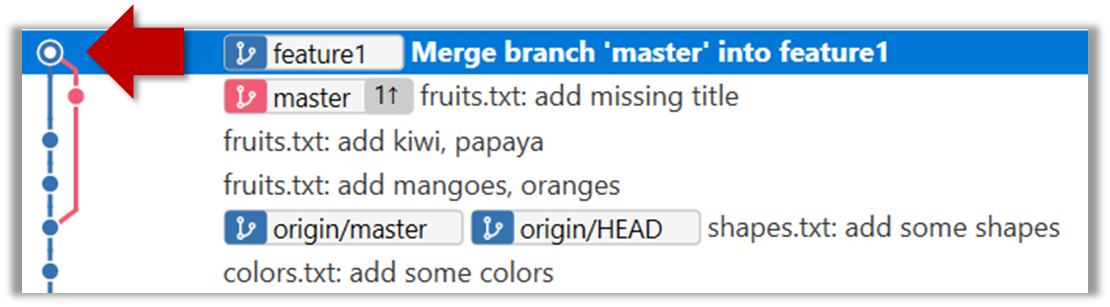
Right-click on the master branch and choose merge master into the current branch. Click OK in the next dialog.
$ git merge master
The objective of that merge was to sync the feature1 branch with the master branch. Observe how the changes you did in the master branch (i.e. the imaginary bug fix) is now available even when you are in the feature1 branch.
To undo a merge,
- Ensure you are in the .
- Do a hard reset (similar to how you delete a commit) of that branch to the commit that would be the tip of that branch had you not done the offending merge.
In the example below, you merged master to feature1.
If you want to undo that merge,
- Ensure you are in the
feature1branch. - Reset the
feature1branch to the commit highlighted in the screenshot above (because that was the tip of thefeature1branch before you merged themasterbranch to it.
Instead of merging master to feature1, an alternative is to rebase the feature1 branch. However, rebasing is an advanced feature that requires modifying past commits. If you modify past commits that have been pushed to a remote repository, you'll have to force-push the modified commit to the remote repo in order to update the commits in it.
7. Add another commit to the feature1 branch.
8. Switch to the master branch and add one more commit.
9. Merge feature1 to the master branch, giving and end-result like this:
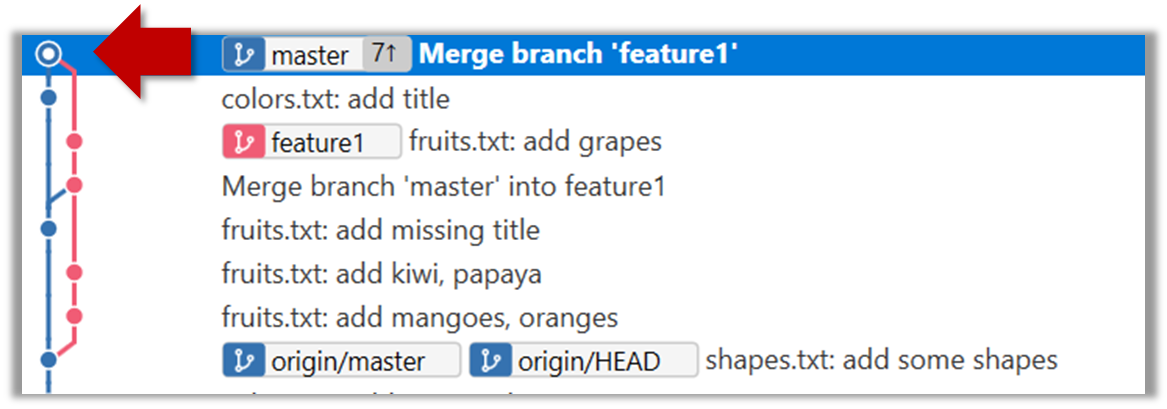
Right-click on the feature1 branch and choose Merge....
$ git merge feature1
10. Create a new branch called add-countries, switch to it, and add some commits to it (similar to steps 1-2 above). You should have something like this now:
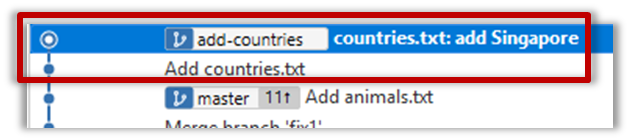
Avoid this rookie mistake!
Always remember to switch back to the master branch before creating a new branch. If not, your new branch will be created on top of the current branch.
11. Go back to the master branch and merge the add-countries branch onto the master branch (similar to steps 8-9 above). While you might expect to see something like the following,
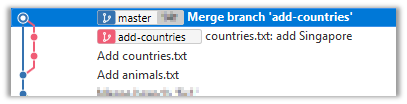
... you are likely to see something like this instead:

That is because Git does a fast forward merge if possible. Seeing that the master branch has not changed since you started the add-countries branch, Git has decided it is simpler to just put the commits of the add-countries branch in front of the master branch, without going into the trouble of creating an extra merge commit.
It is possible to force Git to create a merge commit even if fast forwarding is possible.
Tick the box shown below when you merge a branch:
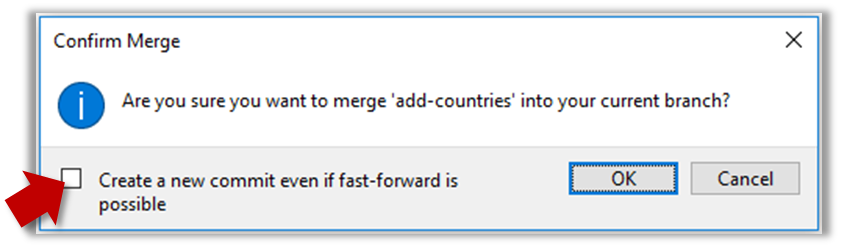
Use the --no-ff switch (short for no fast forward):
$ git merge --no-ff add-countries
[Textbook location: Tools → Git and GitHub → Dealing with merge conflicts]
Can use Git to resolve merge conflicts
Merge conflicts happen when you try to combine two incompatible versions (e.g., merging a branch to another but each branch changed the same part of the code in a different way).
Here are the steps to simulate a merge conflict and use it to learn how to resolve merge conflicts.
0. Create an empty repo or clone an existing repo, to be used for this activity.
1. Start a branch named fix1 in the repo. Create a commit that adds a line with some text to one of the files.
2. Switch back to master branch. Create a commit with a conflicting change i.e. it adds a line with some different text in the exact location the previous line was added.
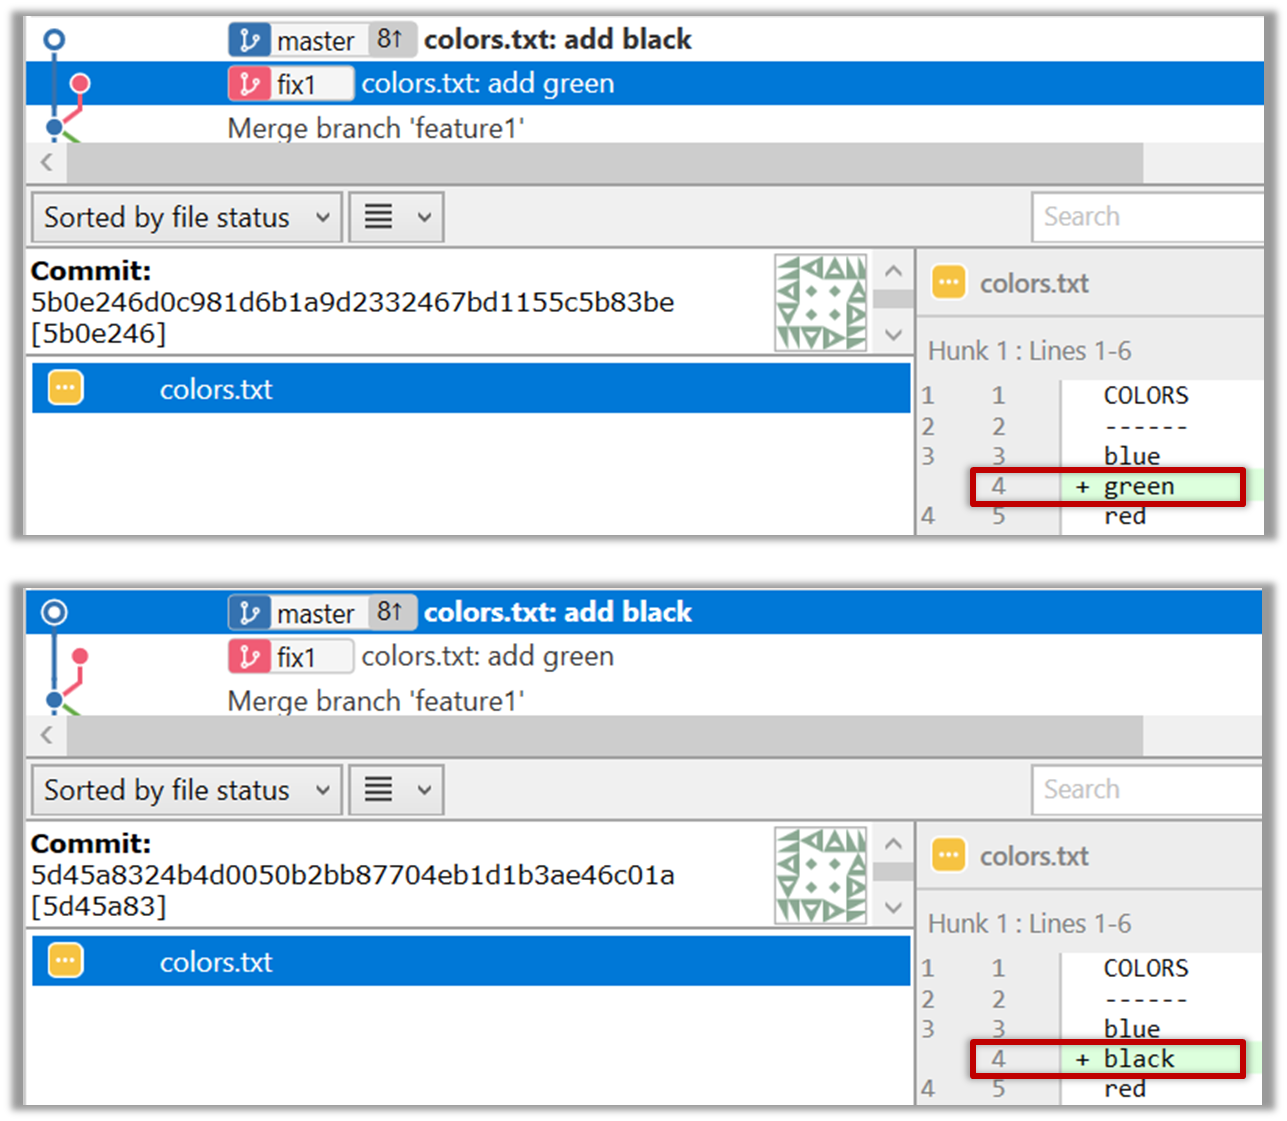
3. Try to merge the fix1 branch onto the master branch. Git will pause mid-way during the merge and report a merge conflict. If you open the conflicted file, you will see something like this:
COLORS
------
blue
<<<<<< HEAD
black
=======
green
>>>>>> fix1
red
white
4. Observe how the conflicted part is marked between a line starting with <<<<<< and a line starting with >>>>>>, separated by another line starting with =======.
Highlighted below is the conflicting part that is coming from the master branch:
blue
<<<<<< HEAD
black
=======
green
>>>>>> fix1
red
This is the conflicting part that is coming from the fix1 branch:
blue
<<<<<< HEAD
black
=======
green
>>>>>> fix1
red
5. Resolve the conflict by editing the file. Let us assume you want to keep both lines in the merged version. You can modify the file to be like this:
COLORS
------
blue
black
green
red
white
6. Stage the changes, and commit. You have now successfully resolved the merge conflict.
[Textbook location: Tools → Git and GitHub → Working with remote branches]
Can work with remote branches
Git branches in a local repo can be linked to a branch in a remote repo so the local branch can 'track' the corresponding remote branch, and revision history contained in the local and the remote branch pair can be synchronized as desired.
[A] Pushing a new branch to a remote repo
Let's see how you can push a branch that you created in your local repo to the remote repo. Note that this branch does not exist in the remote repo yet.
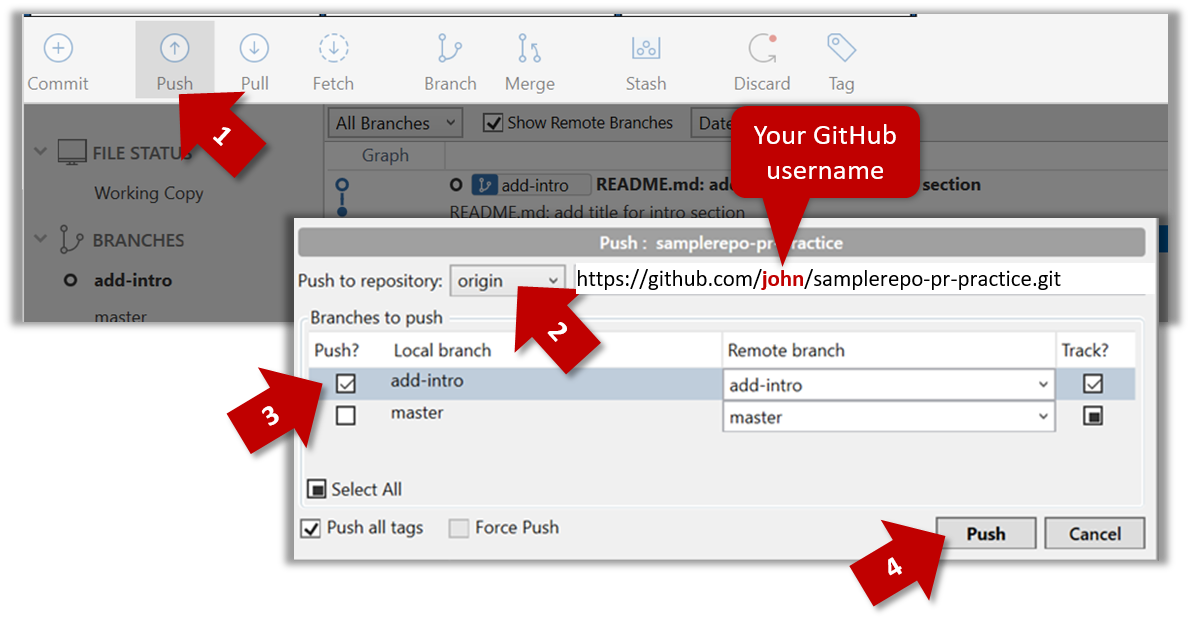
Given below is how to push a branch named add-intro to your own fork named samplerepo-pr-practice.
We assume that your local repo already has the remote added to it with the name origin. If that is not the case, you should first configure your local repo to be able to communicate with the target remote repo.
- Click on
Pushbutton, which opens up the Push dialog. - Choose the remote that you wish to push the branch (assuming you've added that repo to your Sourcetree already).
- Select the branch(es) you want to push -- in this case,
add-intro.
Ensure theTrack?checkbox is ticked for the selected branch(es). - Click
Push.
$ git push -u origin add-intro
The -u (or --set-upstream) flag tells Git that you wish the local branch to 'track' the remote branch that will be created as a result of this push.
See git-scm.com/docs/git-push for details of the push command.
[B] Pulling a remote branch for the first time
Here, let's see how to fetch a new branch (i.e., it does not exist in your local repo yet) from a remote repo.
1. Check the list of remote branches by expanding the REMOTES menu on the left edge of Sourcetree. If the branch you expected to find is missing, you can click the Fetch button (in the top toolbar) to refresh the information shown under remotes.
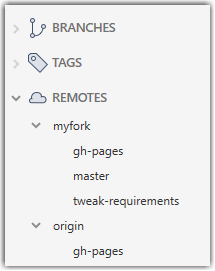
2. Double-click the branch name (e.g., tweak-requirements branch in the myfork remote), which should open the checkout dialog shown below.
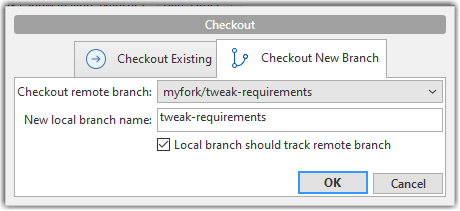
3. Go with the default settings (shown above) should be fine. Once you click OK, the branch will appear in your local repo. Furthermore, that repo will switch to that branch, and the local branch will the remote branch as well.
1. Fetch details from the remote. e.g., if the remote is named myfork
$ git fetch myfork
2. List the branches to see the name of the branch you want to pull.
$ git branch -a
master
remotes/myfork/master
remotes/myfork/branch1
-a flag tells Git to list both local and remote branches.
3. Create a matching local branch and switch to it.
$ git switch -c branch1 myfork/branch1
Switched to a new branch 'branch1'
branch 'branch1' set up to track 'myfork/branch1'.
-c flag tells Git to create a new local branch.
[C] Syncing branches
In this section we assume that you have a local branch that is already tracking a remote branch (e.g., as a result of doing [A] or [B] above).
To push new changes in the local branch to the corresponding remote branch:
Similar to how you pushed a new branch (in [A]):
Similar to [A] above, but omit the -u flag. e.g.,
$ git push origin add-intro
If you push but the remote branch has new commits that you don't have locally, Git will abort the push and will ask you to pull first.
To pull new changes from a remote branch to the corresponding local branch:
1. Switch to the branch you want to update by double-clicking the branch name. e.g.,
2. Pull the updated in the remote branch to the local branch by right-clicking on the branch name (in the same place as above), and choosing Pull <remote>/<branch> (tracked) e.g., Pull myfork/add-intro (tracked).
1. Switch to the branch you want to update using git checkout <branch> e.g.,
$ git checkout branch1
2. Pull the updated in the remote branch to the local branch, using git pull <remote> <branch> e.g.,
$ git pull origin branch1
If you pull but your local branch has new commits the remote branch doesn't have, Git will automatically perform a merge between the local branch and the remote branch.